Trailing Arm Angles: How They Control Rear Bite
Master your dirt car rear suspension. Learn how trailing arm angles control forward bite, rear steer, and side bite to dominate slick and heavy tracks.
Your trailing arms are the primary levers that translate engine horsepower into forward motion. They are the vital physical connection between your rear end housing and your chassis.
If your trailing arm setup is wrong, you are just spinning tires and making noise. You can buy the most expensive shocks on the market, but if the mechanical geometry of your trailing arms is binding the rear end, you will never get the car hooked up.
Let’s break down exactly how trailing arm angle and length dictate your forward bite, side bite, and rear steer on a dirt oval.
The Physics of the Angle
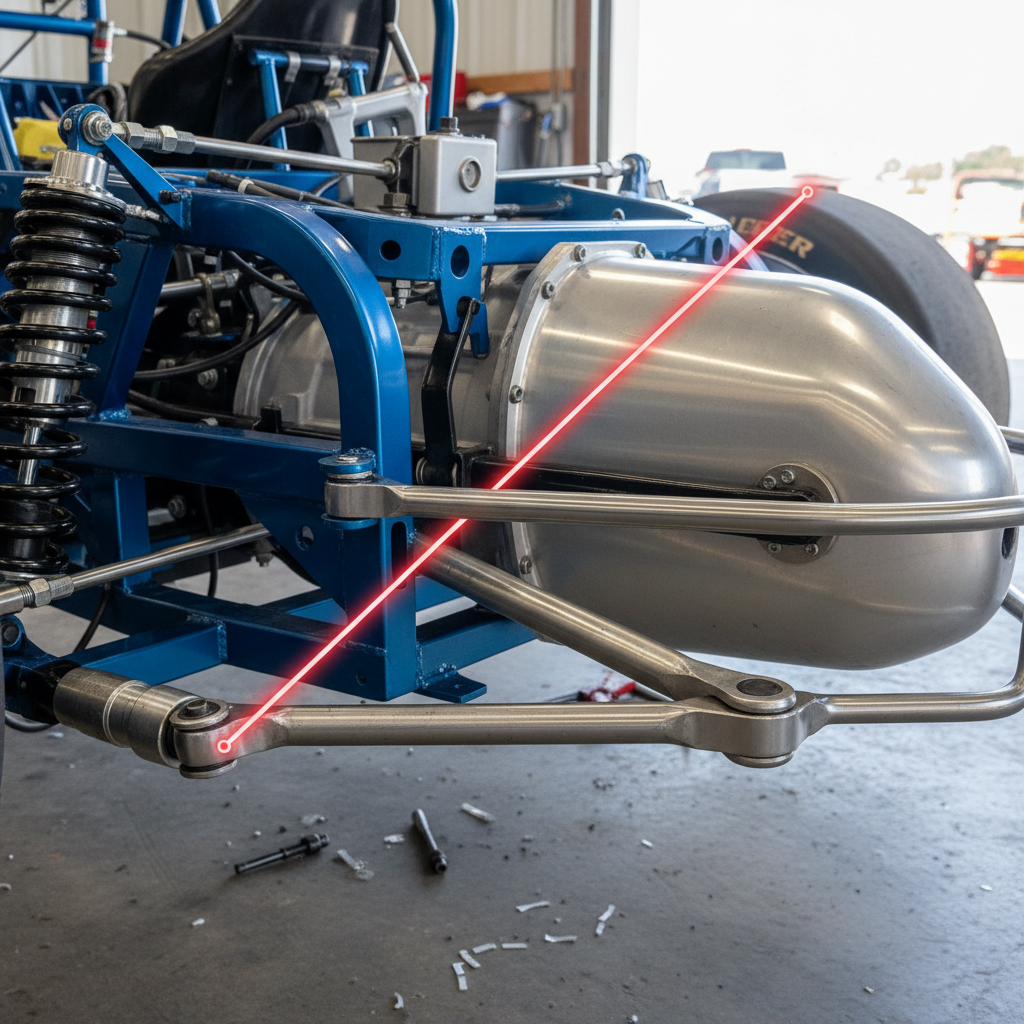
The angle of your trailing arm is determined by the height difference between the chassis mount (front pivot) and the rear end mount (birdcage or axle bracket). This angle dictates how the rear end housing interacts with the chassis under acceleration.
When you apply throttle, the rear axle tries to rotate backward. This rotational force is transferred through the trailing arms into the chassis.
Uphill Angles (Chassis mount higher than rear end mount) An uphill angle creates anti-squat. When the rear end tries to wrap, the uphill arm pushes up on the chassis and drives the tire aggressively down into the dirt.
More uphill angle equals more initial forward bite. However, if you crank too much uphill angle into the arm, the suspension will bind, causing violent wheel hop when the tire breaks traction.
Downhill Angles (Chassis mount lower than rear end mount) A downhill angle promotes suspension squat and reduces initial forward bite. The chassis absorbs the rotational energy by squatting rather than planting the tire. This is rarely used on the left side but is occasionally utilized on the right side to keep the car free on corner entry.
Left Rear vs. Right Rear: Two Different Jobs
Your rear tires do not do the same job on a dirt track. Therefore, your trailing arm angles should rarely match side-to-side.
The Left Rear (LR) Setup The LR is your drive tire. Its primary job is to plant hard and launch the car forward off the corner.
- You typically want 4 to 8 degrees of uphill angle on the LR.
- This steep angle utilizes the engine torque to mechanically force the left rear tire into the track surface.
- On a heavy, tacky track, you can run slightly less angle because the track provides the grip.
- On a dry slick track, you need more uphill angle to artificially manufacture bite.
The Right Rear (RR) Setup The RR tire needs to control your side bite and allow the car to roll through the center of the corner. If the RR is locked down too hard, the car will push like a dump truck.
- Keep the RR angle flatter, usually 0 to 4 degrees uphill.
- A flatter arm allows the right side of the chassis to roll smoothly without violently disrupting the contact patch of the tire.
- If the car is chronically loose on corner exit, lowering the RR chassis mount (reducing the uphill angle) can free up the bind and let the tire glide over the slick spots.
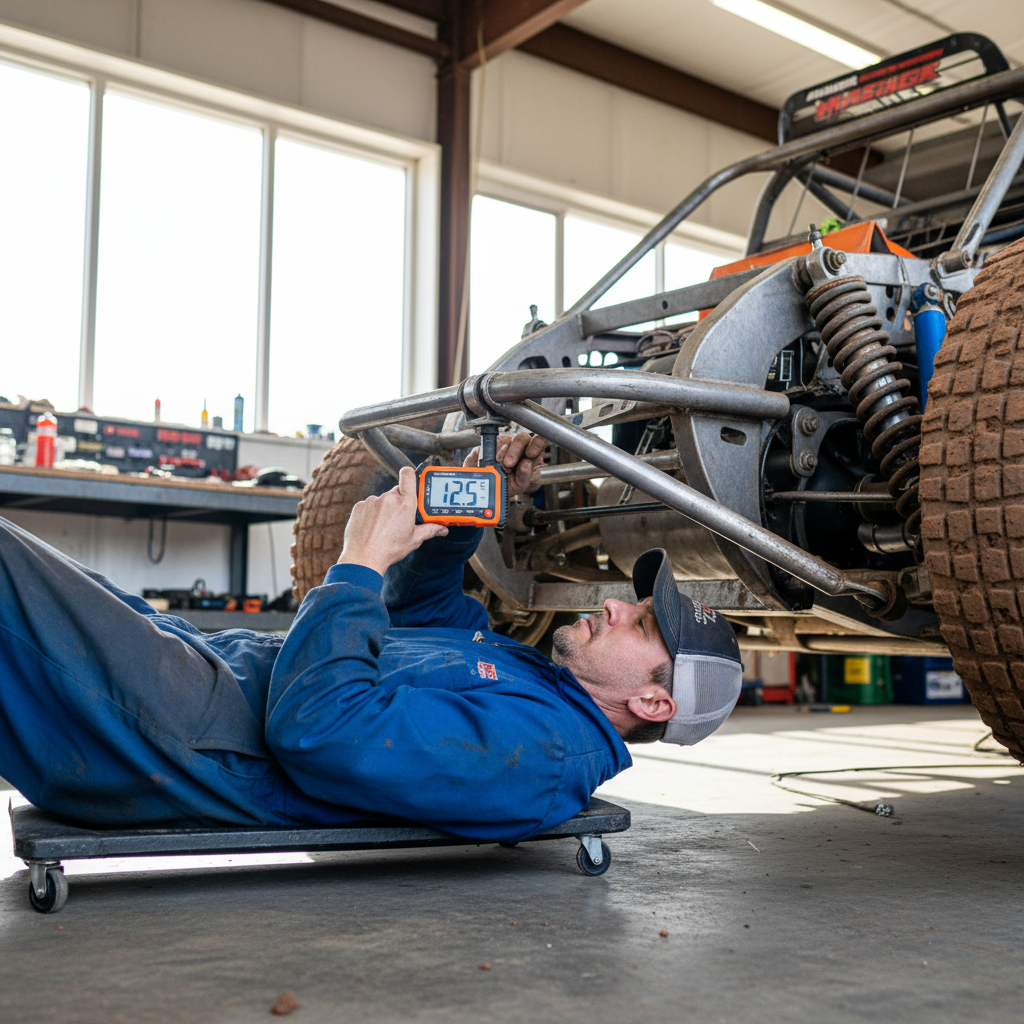
How to Measure Your Angles Like a Pro
Do not guess your angles by eyeballing the mounting holes. A one-hole move on your chassis bracket completely changes the dynamic of the race car.
- Set Ride Height: Always measure angles with the car at exact race-ready ride height. Include driver weight and fuel.
- Zero Your Gauge: Place your digital angle finder on the frame rail (or a known level chassis tube) and zero it out. Shop floors are never perfectly level.
- Measure the Tube: Place the angle finder directly under the center of the trailing arm tube.
Rear Steer: The Hidden Geometry
As your chassis rolls in the corners, your trailing arms swing through an arc. Because the arm is moving in an arc, the horizontal distance between the chassis mount and the rear axle changes. This causes the wheelbase to shorten or lengthen on that side of the car.
This is rear steer.
- Roll Understeer: If the arm is angled uphill, as the chassis rolls down (suspension compresses), the arm flattens out. This pushes the rear end back, lengthening the wheelbase on that side.
- Roll Oversteer: If the arm is angled downhill, compressing the suspension pulls the rear end forward, shortening the wheelbase.
If you have a steep uphill angle on the right rear, as the chassis rolls onto the right side in the corner, that side's wheelbase lengthens. This steers the rear end to the left, pointing the nose of the car toward the infield. This helps the car turn, but too much of it will make the car undrivable on a slick track.
Trailing Arm Length: The Timing of the Bite
Angle dictates how much bite you get. Length dictates when you get it.
Short Arms (13 to 15 inches) Short arms swing through a tighter arc. They react violently and instantly. When you hit the gas, a short arm shocks the tire, providing immediate bite. This is fantastic for heavy, tacky tracks where you need to snap the car forward and the dirt can handle the abuse. On a slick track, a short arm will simply break the tires loose.
Long Arms (18+ inches) Long arms swing through a wider, flatter arc. They apply load progressively. When you throttle up, a long arm smoothly transfers the weight, saving the tire's contact patch. If you are racing on dry slick, you need long trailing arms to keep the car connected to the dirt.
The Trailing Arm Cheat Sheet
Use this baseline guide to set your initial trailing arm geometry based on track conditions.
| Track Condition | LR Angle | RR Angle | LR Length | RR Length | | :--- | :--- | :--- | :--- | :--- | | Heavy / Tacky | 4° - 6° uphill | 0° - 2° uphill | Short | Long | | Slick / Dry | 6° - 8° uphill | 2° - 4° uphill | Long | Long | | Rough / Rutted| 5° - 7° uphill | 1° - 3° uphill | Medium | Medium |
Every adjustment you make to your trailing arms needs to be documented. Make a habit of logging your baseline angle, executing your adjustment, and then using the race results tracking inside Maximum Zone Systems (MZS) to see if that two-degree drop actually improved your lap times in the feature. Data beats guesswork every time.
The thing most racers miss: Static angle isn't dynamic angle. You might measure 5 degrees uphill in the shop, but when the chassis rolls three inches in the corner, that right rear arm might go completely flat. Always map out your angles at ride height and at your estimated dynamic roll height.

Stop blaming your tires or your shocks for a car that won't hook up. Get under the rear end, zero out your angle finder, and take control of your suspension geometry.
Angles dictate action; master your trailing arms, and you dictate the race.