Bump Stop Wear & Replacement Intervals: What Weekly Racers Need to Know
Polyurethane bump stops lose rate through heat cycling — quietly degrading your setup without visible signs. Here's how fast they wear, how to check, and when to replace by class.

Most weekly racers treat bump stops like set-it-and-forget-it hardware. They go in before the season, and they come out when someone finally thinks to look. That's a mistake. A worn bump stop doesn't fail catastrophically — it just quietly gives up rate, and your car gets worse without you knowing why.
If you've ever had a car that felt great in May and inexplicably loose on entry by July — and you hadn't changed a thing — this might be your answer.
What a Bump Stop Actually Is
At its core, a bump stop is a progressive spring. Unlike a steel coil spring that gains rate linearly, polyurethane bump stops are exponential — the further you compress them, the faster rate builds. That's by design. A christmas tree style bump stop (the most common on dirt modifieds) uses its tapered geometry to produce a smooth, rising rate curve as the shock travels into it.
This is what makes them so useful for dirt cars. You can run a softer primary spring for compliance over rough surfaces while the bump stop kicks in to build tire load when it matters most — typically on entry and through the center of the corner. It's acting as both a spring and a damper simultaneously, absorbing energy and returning it at a controlled rate.
How It Works: A bump stop sits on the shock shaft (or in the coilover body) and contacts the shock body or a packer stack at a specific point in shock travel. The gap between the bump stop and the contact point — set by packers or shims — determines when engagement begins. Once it engages, rate builds progressively through the rest of travel. The christmas tree shape produces a larger "soft zone" early in compression before rate escalates sharply.
Why Rate Degrades Over Time
Here's the part most racers don't know: polyurethane bump stops lose rate through heat cycling. Every time that bump stop compresses under load — every bump, every corner entry, every lap — it generates heat. That heat is absorbed into the polyurethane. Over time, repeated heating and cooling cycles cause the material to take a permanent "set," meaning it no longer fully returns to its original geometry or stiffness after compression.

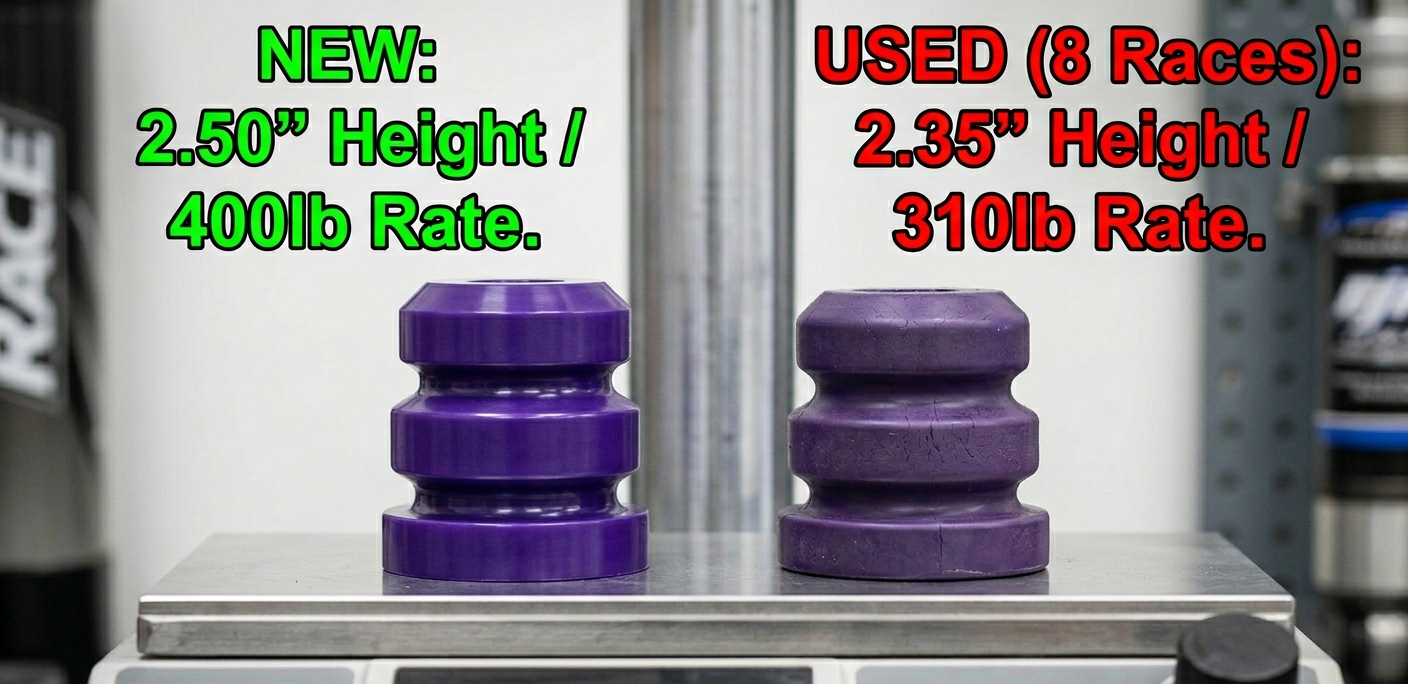
The result is a bump stop that measures shorter than when it was new, engages later in travel than intended, and delivers less rate than your setup calls for. Critically, none of this is visible to the naked eye. The bump stop looks fine sitting in your hand. The only way to confirm it is on a spring rate tester — or by running an identical new one next to it on the machine and comparing deflection curves.
"I primarily run bump stop packages on the right front of my modified. My rule of thumb is every 4 races they get replaced. I can see it on the spring smasher — visually, the rate isn't there anymore compared to a fresh one. Water doesn't help them either, so I keep them away from water whenever possible." — Mike Chasteen Jr., Modified Driver
This isn't just a weekly racer observation. Industry experts confirm the same pattern: as bump stops heat cycle repeatedly, they become brittle and lose rate — eventually cracking apart. At the top of the sport, World of Outlaws sprint car teams change their bump stops every single race night. That's the professional benchmark.
"Once you've heat cycled them enough times, they get brittle and start to come apart."
Moisture compounds the problem. Water intrusion — from washing the car, rain events, or humid storage — accelerates material degradation in polyurethane. This is especially relevant for dirt track cars that get sprayed down regularly. If your bump stop is getting wet on a consistent basis, your effective service interval gets shorter.
The Right-Front Problem
On a dirt modified, the right front is where bump stop strategy matters most — and where wear happens fastest. That corner carries more load, sees more shock travel, and is the primary driver of entry and center handling characteristics. The RF bump stop is working harder than any other corner on your car.
This is why experienced modified setups are often more aggressive with RF bump stop rate than other corners — and why RF is the corner most likely to drift off-spec from wear. If you're only going to check and replace bump stops at one corner, start there.
Replacement Intervals by Class
There's no universal spec here — interval depends heavily on how aggressively the car rides on the bump stop and the compound you're using. But here's a practical starting framework based on racer experience at the weekly level:
Open Wheel Modified — 3–5 Race Nights
RF is primary concern. Hard compound stops may extend interval slightly; soft compounds wear faster. Verify on spring rate tester.
Late Model — 2–4 Race Nights
High chassis loads and frequent bump engagement accelerate wear. Watch for height change — shorter engagement means delayed load transfer.
Street Stock / Limited — 4–6 Race Nights
Where legal per your rules. Less aggressive chassis loads allow a longer interval, but still check height — engagement point creep is the biggest risk.
The WoO Standard: World of Outlaws sprint car teams running aggressive bump stop setups change them every race night. At $30–50 per stop, it's still one of the most cost-effective performance maintenance items on a race car. If the pros won't run a used one, consider what that means for your program.
How to Know It's Time
Don't wait for a visible sign of failure. By the time a bump stop looks worn, it's been hurting your setup for weeks. Use these checkpoints instead:
-
Height Change — Measure your bump stops with a caliper. A stop that has taken a set will be shorter than its original spec. Even 1/16" of height loss shifts your engagement point, meaning the car has to travel further before load builds — changing your corner entry behavior without any adjustment on your end.
-
Rate Loss on the Spring Smasher — This is the definitive test. Put the used stop next to a new one and compare deflection at the same load point. If you can see the difference visually, it's already well off-spec. Test quarterly at minimum, or after any event where the car ran particularly rough track conditions.
-
Surface Cracking or Brittleness — Run your thumb across the surface. A fresh bump stop should feel smooth and slightly tacky. A heat-cycled stop feels drier, harder, and may show surface micro-cracks — especially around the tree fins. If you see cracks, it's already breaking down structurally.
-
Water Exposure History — If the car got rained on, ran in wet conditions, or got soaked during a wash and the bump stop wasn't removed, shorten your interval. Water accelerates degradation and can cause uneven hardness across the material — inconsistent rate across the compression range.
-
Unexplained Setup Drift — If your car is getting looser on entry or pushing more through the center without any setup changes, and your spring rates and shock settings haven't moved — check your bump stops before you start chasing the problem everywhere else. This is the symptom most teams diagnose last when it should be diagnosed first.
Practical Storage & Handling
Extend the life of bump stops you're keeping in service with a few basic habits:
- Keep them dry. Remove bump stops before washing the car if possible. Store spares in a sealed bag or small container in the tool cart — not loose in a parts bin where they'll absorb moisture.
- Avoid prolonged heat exposure. Don't store them next to the exhaust side of the car or anywhere they'll bake between races. Ambient heat without the pressure-and-release cycle still degrades the material.
- Mark your install date. Write the date on the bump stop with a paint marker or keep a log. Without a date, you're guessing at interval — and you'll always err toward leaving them in too long.
- Buy in small quantities. Bulk ordering bump stops and letting them sit for a season before use isn't ideal. Polyurethane does have a shelf life, though it's long. Fresh stops perform more predictably than ones that have been sitting in storage for two years.
- Test before you install. If you have a spring rate tester, baseline your new bump stops before they go in. That gives you a reference to compare against when you pull them. Without a baseline, you're only guessing at how much rate you've lost.
The Bottom Line for Weekly Racers
The gap between a professional racing operation and a weekly Saturday night team isn't always the equipment — it's the maintenance discipline. Top teams change their bump stops every night because they know exactly what that component is worth to their setup.
At the weekly level, a 4-race interval on your critical corners is a reasonable, cost-effective standard. A fresh set of christmas tree stops costs less than a tank of racing fuel. The rate you're losing by leaving worn stops in the car is costing you more than that in lap time and setup confusion.
Check the height. Run them on the smasher if you have access. Replace on an interval — not when they look bad. Log your installs so you're not guessing. That's the discipline that separates cars that get faster through the season from ones that inexplicably go the other way.
Track It in MZS: MZS Parts Tracker logs bump stops by corner, install date, and race count — so you know exactly where you are in the service interval on every component. Set a low-stock alert so you're never at the track without a fresh set. maxzonesys.com